Partial Refunds

ITS YOUR RACE now has the ability to offer a participant a partial refund on their order.  Since IYR allows a person to register multiple people in one order, partial refunds are often requested along with the request to remove just one or a few participants from the event.  Now, race directors, manager and timers have that ability with partial refunds.

To issue a partial refund, go to your ADMIN dashboard for your event and go to REGISTRATION then ORDERS.  Look up the order that is requesting the partial refunds and EDIT it:

partial

Scroll down to the bottom of the edit order page and click the REFUND PAYMENT button:

partial1a

Now, on the REFUND SCREEN, you’ll see that you have the option to issue a FULL or PARTIAL REFUND.  When you select PARTIAL REFUND, we drop down the line items from that order and allow you to remove a participant from an event and then manually put in the amount to be refunded:

partial2.jpg

Select whether to send a receipt to the registrant, insert a custom message if you wish and then click the button to REFUND ABOVE AMOUNT.

The customer will receive the following email notifying them that a partial refund has been issued:

partial5

Creating a “Hidden Registration Type”

Some races wish to open registration early for a special group of individuals or because of a promotion that they are running.  Some events may have a large group or a few individuals that “missed the boat” on registering before the closing date and wish to open registration again just for those people that have inquired.

ITS YOUR RACE now has the ability to create a registration type, and make it hidden from the general public that are registering for their event.  Once you have a registration type set to “HIDDEN”, you can then create a promo code that when applied, will display the registration type.

To do this, first go to REGISTRATION and REGISTRATION TYPES and click ADD A NEW REGISTRATION TYPE.

Fill out the registration type name, price, active dates for the registration type.  You can add price levels if you wish after you save the registration type.  If you are doing different price levels, so be sure to just set the first price and the dates that that price is active.  Once you save the registration type, you can add additional price levels.

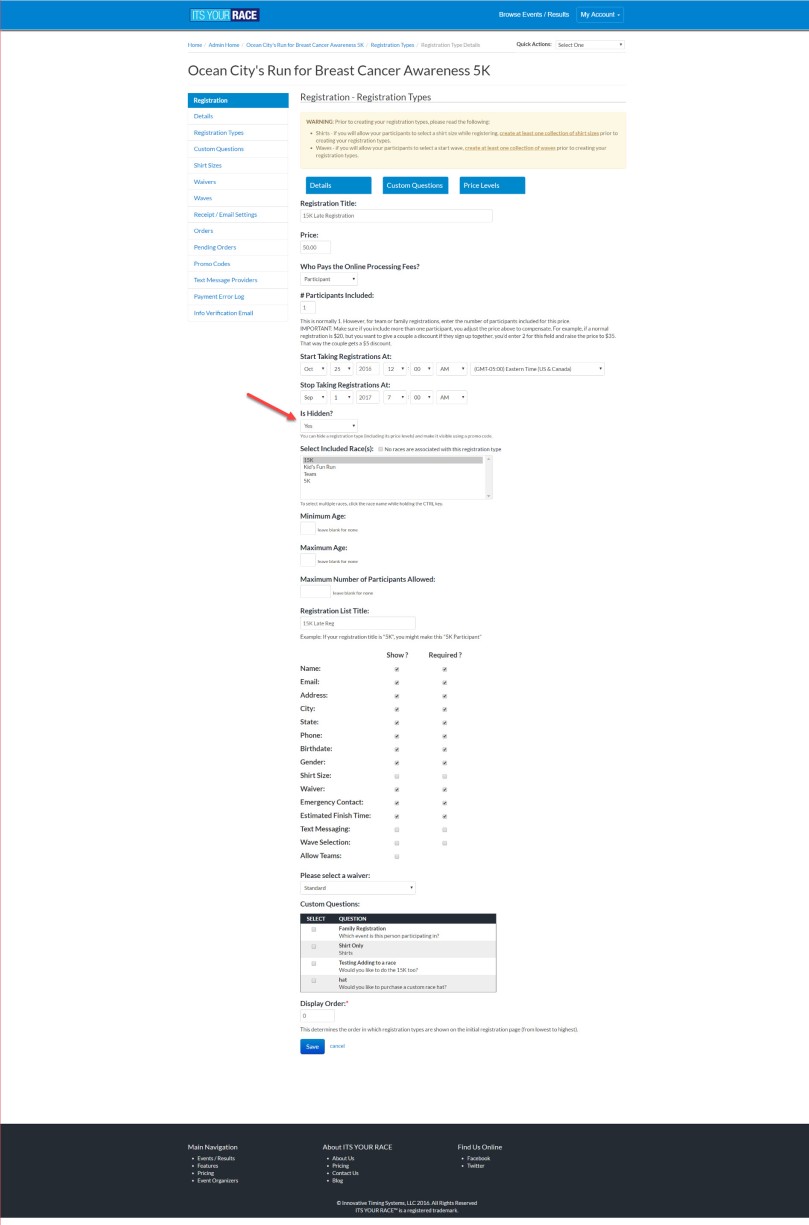
In my example below, I created a registration type called “15K Late Registration” and as noted below, I set it to HIDDEN:

hidden_type.jpg

Once I’ve saved my registration type, I then go to REGISTRATION again in the admin tool and click on the PROMO CODES menu item.  Click on ADD A NEW PROMO CODE and fill out the form.

Create your promo code that will display the hidden registration types when applied.  In my example below, I am choosing to create a promo code called “LateReg” which will allow people to still register after registration is closed.  Note that I am limiting the promo code to my hidden registration type “15K Late Registration” and I marked YES to “Makes Hidden Registration Types Visible”

promo

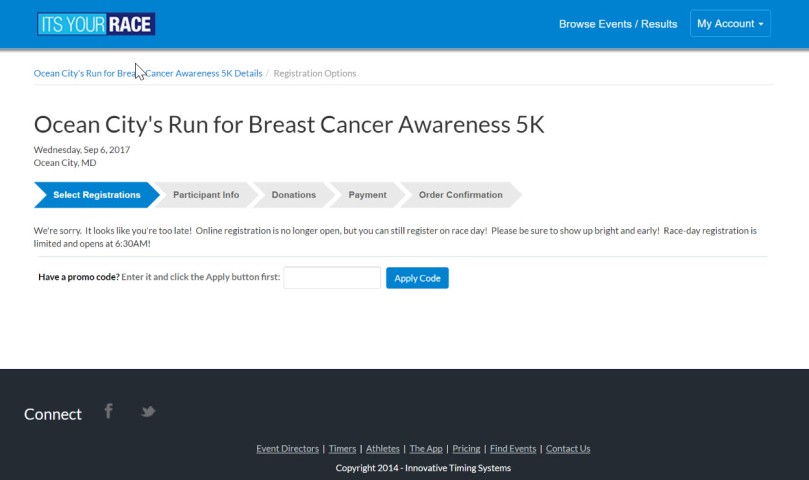
SAVE your promo code.  Now, when I go to register, it appears to participants that registration has closed:

reg_closed.jpg

However, when I apply the promo code, the “Late 15K Registration” reg type that I created as hidden now appears:

hidden_promo

Let


Adding “Order Add-Ons” with custom questions

Often times, an event will want to offer additional tickets or merchandise with their race registration. ITS YOUR RACE allows you to set up custom questions and add prices to the answers.  We charge 6% plus $0.30 on these type of transactions.  It’s important to note that there is no option to push these fees off to the participant, so be sure to factor that in when you are setting up your pricing options.  If you are selling a hat for $10.00, you will receive $9.10.

You have the option to add custom questions during the registration setup process, however, you can also add custom questions like this once you have registration set up.  This example below takes into account that you already have registration set up on ITS YOUR RACE.

Go to your admin tool for the event and click on REGISTRATION then select CUSTOM QUESTIONS. Fill our your Question Name (this is for admin use only) and Display text (this is what the participant will see when they are going through the registration process).

My example:

QUESTION NAME: Hat

DISPLAY TEXT:  Would you like to purchase a custom race hat? (you can view the hat here)

For the “ANSWER TYPE:”, note that only options for custom questions that will incur a fee are “Drop-Down List, Radio Buttons and List Box”.  A list box will allow people to select more than 1 option, so if you are asking people if they want to purchase additional shirts, they can choose two smalls and a large if they wish.

In my example, I’ve chosen “Radio Buttons” and my possible answers are “Yes” with a price set to $10.00 and “No” with a price set to $0.00.  The display order is which order you’d like the answers to appear in.

SAVE the question.  Now, we need to apply this custom question to one of our registration types.  Go to REGISTRATION and REGISTRATION TYPES.  EDIT the registration type where you want this custom question to appear.  Scroll down and check the box next to your custom question.  SAVE the registration type.

Your custom question will be applied to the front-end user site and participants will be able to make an additional purchase if they wish during their registration.

You can download ORDER data under IMPORT/EXPORT DATA to view these purchases and account for them.


Multiple Events within 1 Stripe Account

Many timers or event directors have multiple events set up on ITS YOUR RACE.  A timer has the option of direct depositing the registration funds into their own account and paying out their event director.  In order to keep the accounting for your events separate, Stripe offers an option to “create a new account within one master account”.  That way, you can switch between accounts and reconcile the different amounts that were deposited from each separate event and know which amount to pay out to each race director.

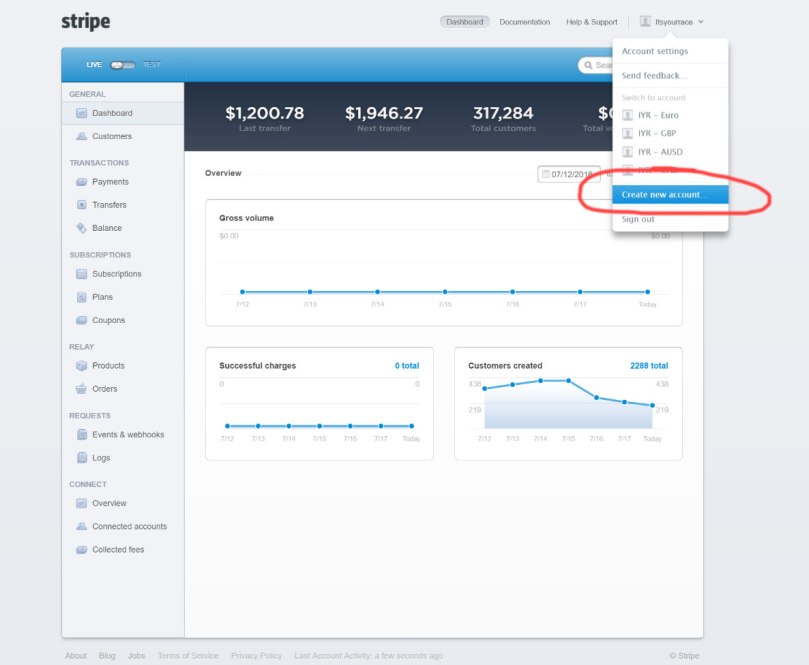
This process is only applicable if you’ve already set up 1 event on ITS YOUR RACE and have a Stripe account set up for direct deposit on that event.  BEFORE YOUR CREATE THE NEW EVENT ON ITS YOUR RACE, login to your Stripe account.  In the upper right corner, click on your account name and select CREATE A NEW ACCOUNT:

stripe1

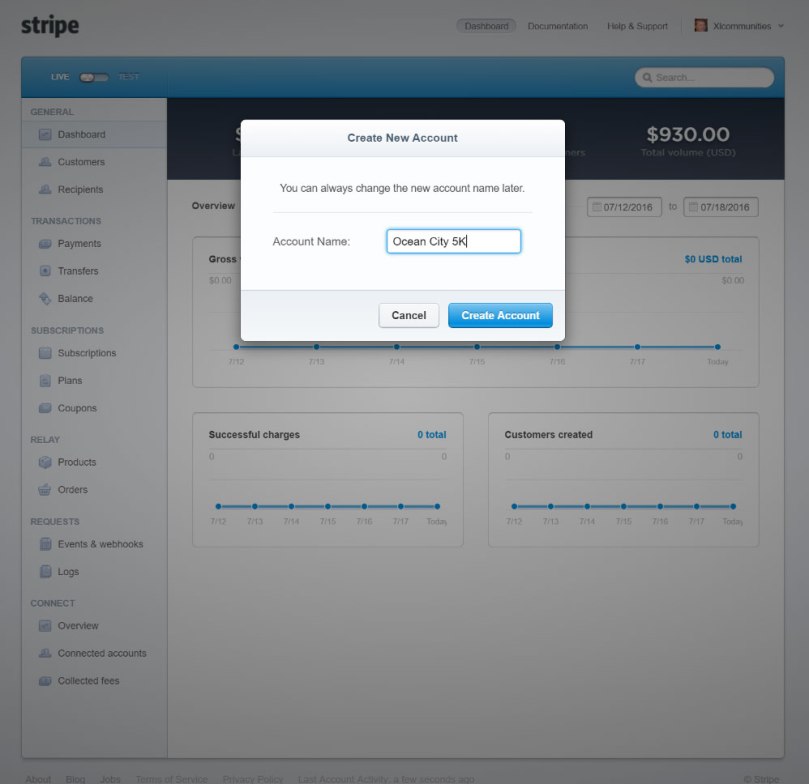
Name your new account after the event name…

stripe2

This will take you into the new account dashboard.  Click on the account name in the upper right again and click ACCOUNT SETTINGS

stripe3

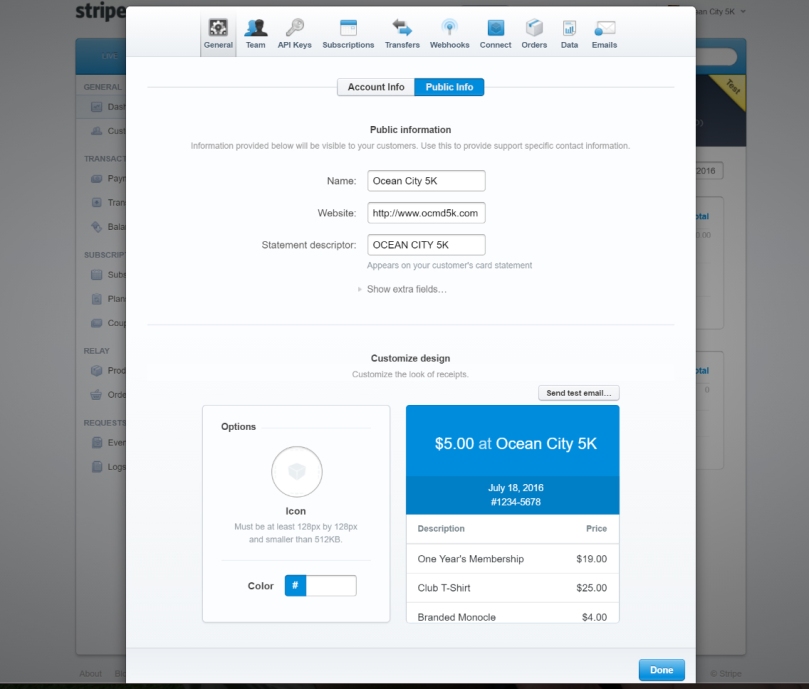
Click on the PUBLIC tab and then fill out the credit card descriptor settings.  This is what your registrants will see on their statement, so we always recommend putting in the event name or something that a registrant will recognize as their race registration charge.

stripe4

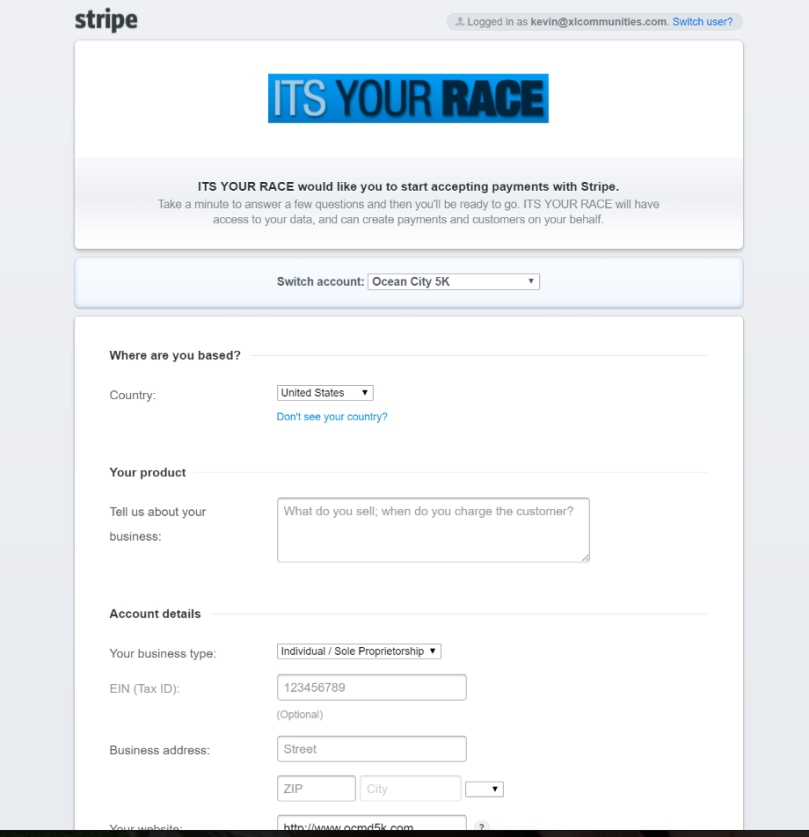
Click DONE.  Then go to ITS YOUR RACE and create your new event.  Once you go through the event creation wizard and get to the step where you sign up for registration services, click the CONNECT WITH STRIPE button.  In the upper right corner, there is a link that says “Already have a Stripe account?  Log In”

stripe7

Switch to your newly created account and fill in the appropriate information:

stripe8

This will allow you to manage multiple events within 1 Stripe login for your timing company or race event company.  When you login to Stripe, you can switch between accounts to see how much money came from each event.

Sponsorships for Your Event on IYR

The heart of every race is its participants.  Many events, however, also depend on their valuable sponsors to stay in business and provide their participants with the experience that they deserve.  ITS YOUR RACE now has the ability for every event to provide their sponsors with more exposure AND we now allow you to solicit sponsors directly through your custom IYR details page.

This new feature includes:

  1. A custom SPONSORS page where you can set up custom text, logos and links to your sponsors.  Encourage your sponsors to offer athletes a coupon if possible to give them more exposure!
  2. A custom SPONSORSHIPS page where you can set up “sponsorship levels” and allow sponsors to sign up through ITS YOUR RACE and pay to be a sponsor (6% plus $0.30 fees apply)


Setting up a SPONSORS PAGE

  1. Go to the admin tool for your event and click on SPONSORS.  You will be taken to the SPONSORS CONTENT page.  This is where you will list any current sponsors, and solicit any potential sponsors.  
    1. PLEASE NOTE: In order to show the SPONSORSHIPS page, you must MANUALLY place the link on the SPONSORS PAGE.  At the top of the page, you’ll see the link to the sponsorships page.  Right click the words “sponsorships page” and click “COPY LINK”.  Then go down to the content area for your SPONSORS page and put text such as….
      Interested in becoming a sponsor?  
      Click here to learn more about our sponsorship levels available and to sign up to become a sponsor!

See the example image below for instructions on copying the SPONSORSHIPS PAGE link:

sponsorships_url

  1. After you add the section to solicit sponsors, add a section that thanks your current sponsors and set up the logos, links and offers from all of them.  To add a logo, click on the tool that allows you to INSERT/EDIT IMAGE

Add all of your content and logos.  Here is an example of a complete SPONSORS PAGE:
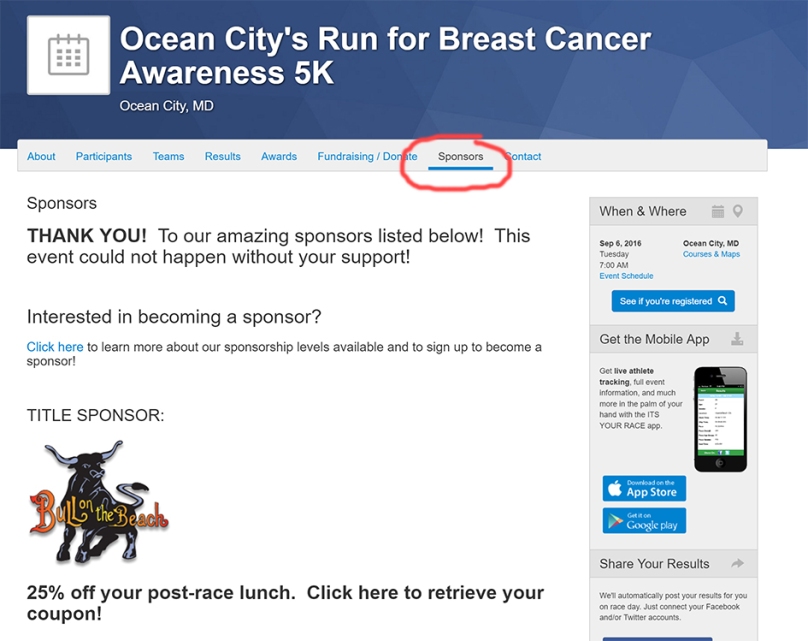
sponsor_frontend


Setting up a SPONSORSHIPS PAGE

Your SPONSORSHIPS PAGE enables you to solicit additional sponsors and allow them to pay online via ITS YOUR RACE.  There is a 6% plus $0.30 processing fee for sponsorship fees, however, we do cap the ITS YOUR RACE portion of the fees to $12.95.  The credit card processing fees (2.9% plus $0.30) have no cap on them.  This means that any payment over $418 will results in a fee of 2.9% plus $13.25 ($12.95 + $0.30).

Once your sponsors are set up, set up some content on your SPONSORSHIPS page.  Let them know WHY they should sponsor your event (how many athletes they will have exposure to, what your cause is, where the location of the event is, etc).  This can be done in the SPONSORSHIPS PAGE content area.  On the SPONSORSHIPS page, we automatically include a button that says “BECOME A SPONSOR”.  This opens a new page where a sponsor can select their level and submit their payment for becoming a sponsor.  You’ll see in my example below that I tell my sponsors to click on that button.

sponsorships_page


Setting up SPONSORSHIPS

Depending on the size and location of your event, you will likely be collecting multiple sponsors at different levels.  Prior to setting up sponsorships on ITS YOUR RACE, you will need to decide your various types of sponsorship levels and the cost for each level.

1) Under the SPONSORS admin feature, click on the menu item for SPONSORSHIPS

2) Fill out the title for your “BECOME A SPONSOR” page, then choose who you want to pay the processing fees.  Most events choose to take the fees out of the sponsor price rather than add the fees to the sponsorship level

3) The CUSTOM HTML for RECEIPT/EMAIL CONFIRMATION is the page that your sponsors will see once their transaction goes through.  Fill this out with information that the sponsor needs to know about the next steps for being featured in your event (ask them to provide you with a logo for your website and/or event tshirt, a link to their website, an offer for event participants, etc).  This will also be included in the email receipt that the sponsor receives.

4) Set up your SPONSORSHIP LEVELS – Click the button to ADD A NEW LEVEL.  You can choose a custom naming scheme for your sponsorship levels.  The DESCRIPTION is the name of the level, the AMOUNT is the price the sponsor will pay, SHOW should be set to YES and the DISPLAY ORDER is the order that the levels will appear in

  1. If you want to allow sponsors to choose their own custom amount, you can do this and set a MINIMUM AMOUNT that they can select to sponsor

Click the SAVE button once you are finished.  Here is an example:
sponsorshipe_level


TURNING ON SPONSORS

Once you have everything set up for your existing sponsors and soliciting potential sponsors, you need to turn the SPONSORS menu item on on the front-end site (your custom event details page on itsyourrace.com)

Go back to your event’s admin home dashboard and click on EVENT SETTINGS.  Then go to WEBSITE MENU ITEMS.  Scroll down to SPONSORS and select SHOW and click SAVE.

Now go to your custom ITS YOUR RACE URL (your event details page).  You’ll see that SPONSORS menu item now appears at the top.  


Multiple Divisions in 1 Registration Type

How can I create a multi-participant registration type that allows people to go into separate divisions?

We received this question a lot, and now we have a solution!  You can now create a CUSTOM QUESTION with a dropdown answer-type that allows you to put a person into a division based on how they answer that question.

So, for example.  I have a REGISTRATION TYPE for a “family of 4” and I have a 15K, a 5K and a kid’s fun run.

First, set up the CUSTOM QUESTION.  Go to REGISTRATION in the admin tool and click on CUSTOM QUESTIONS.  Click the link to ADD A NEW CUSTOM QUESTION.

The QUESTION NAME does not appear to the front-end user (the registering participant) so you can call this something like “Family registration”

The display text should read something like “Which event is this person participating in?”

Select the DROP DOWN LIST answer-type and make the answer shown and required.  This will force each person to select which division they are going into.

Click the ADD A NEW ANSWER button and put in your divisions.  For “price” you can add an additional dollar amount if one of the divisions costs more (see my example below).

6102563401760768

SAVE the question then go to REGISTRATION TYPES and ADD A NEW REGISTRATION TYPE.   My example will be a registration type good for a family or group of 4.  I’m setting the price for 4 people in the 5K and fun run, and then as you can see, I’ve added $7 to the custom question answer if one or more people decided to run the 15K division.

Please note that we currently do not have the ability to have a “variable number” of participants within a registration type, so if you want to have discounts for “up to a family or group of 7, you’ll need to make separate registration types like this:

Family or Group of 4 – $70

Family or Group of 5 – $80

Family or Group of 6 – $95

Family or Group of 7 – $110

When it comes to the question “SELECT INCLUDED RACE(S)”, check the box that says NO RACES ARE ASSOCIATED WITH THIS REGISTRATION TYPE.  This is because your custom question puts the people in the division for you.

Check the box for the custom question that you just created and save the registration type.  See my example below:

groupreg

When people register for the FAMILY OF 4  REGISTRATION TYPE, they will have to answer that custom question for EACH participant, thus putting each participant in the designated division.


Setting Up Fundraising for Your Event

Tar Heel 10 Miler 2015-7-ZF-9988-48892-1-001-003

Philanthropy has become a “hot buzz word” in the racing industry.  Athletes, both young and old want to better themselves through racing, and many of them want to achieve more than that.  Individual fundraising gives athletes extra motivation during their journey to race day.

ITS YOUR RACE has always allowed events using the platform for online registration to set up CHARITIES .  This allows all registrants (and even non-registrants) to simply put in a donation for your charity during the registration process.   Now, you can take that one step further and enable FUNDRAISING.  This feature reaches out to athletes that have registered and asks them not only to donate to the charity, but to create an individual fundraising page, set a goal and enlist others to donate.

To enable this feature, first, you must have online registration enabled and a payment type set up (check or direct deposit).  ITS YOUR RACE will pay all donations out to that entity and it will be the event’s responsibility to pay out their charity.  We provide detailed donation reports so the event can reconcile all donations owed.

Go to the FUNDRAISING menu item in the admin tool.

Fill out the settings:

  1. Title: What do you want to call your event’s fundraising campaign? (eg. The Myrtle Beach Run for Breast Cancer 5K Fundraising”
  2. Enable fundraising should be set to YES if you are ready to turn it on
  3. Goal: how much do you want all of your participants to raise for this event? We keep track of your progress and goal through a meter on your event’s fundraising page.  You should set a realistic goal given the size of your event to encourage participants to set realistic goals for their personal efforts.
  4. Allow Contributors to Pay Processing Fees: (ITS YOUR RACE charges a flat rate of 6% plus $0.30 for all charitable donations made through the fundraising or donation platform. If you select “YES” for this setting, a donor will be given the option to add the fee to their donation, or exclude the fee from their donation.  If you select NO for this setting, the fees will automatically be deducted from all donation amounts)
  5. This is probably the most important part of the fundraising page.  Tell people why they should become individual fundraisers and exactly what or who the charity that benefits from the fundraising helps.  Tell them about the various awards that are given to the top fundraisers.  You can copy and paste photos from your charity’s website here.
  6. Award Levels: You can encourage your fundraising efforts by having different awards and levels. For example, a free entry to next year’s race (or a refund for this year’s race) if they raise $250.  A free tech shirt if they raise $400.  And so on.

Charities – in order for fundraising to be turned on, you must add at least one charity for the fundraising efforts to benefit. After you’ve filled in all of the fundraising settings, select the CHARITIES menu item and click the link to ADD A NEW CHARITY.  Fill out the information for your charity.  Again, the full description is very important because it tells the story on why people should donate to this particular charity.  Add images and tell the story as best as possible.

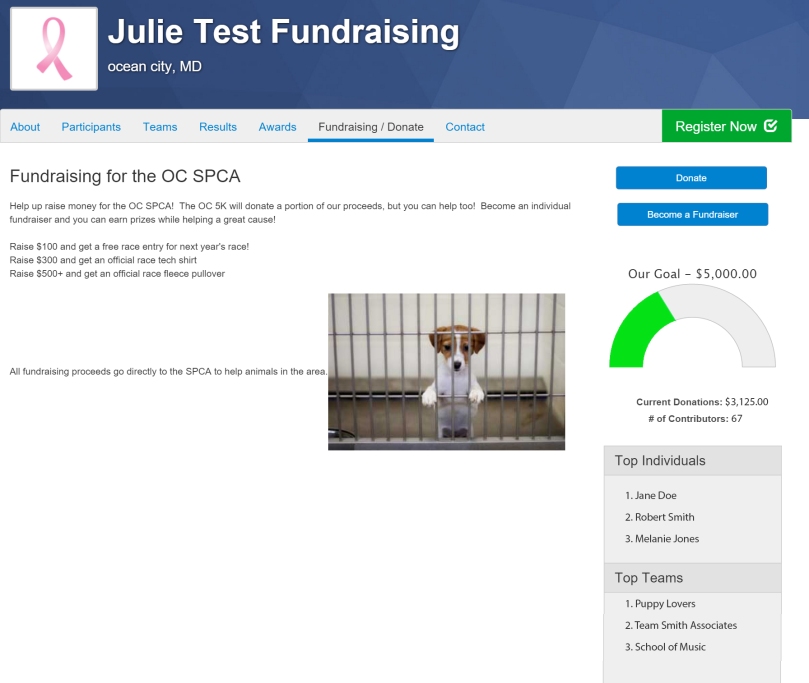
Here is an example of a fundraising campaign:

fundraising_Screen_mockup